Flatbed Trailer Tie Down Essentials: Complete Guide to Cargo Securement for Trucking Professionals
Flatbed trailers are the workhorses of the transportation industry, tasked with hauling oversized, Flatbed trailers are essential in the transportation industry for hauling oversized and irregular cargo. Learn about the importance of proper cargo securement to avoid accidents and ensure safety on th
TIE DOWN


Flatbed Trailer Tie Down Essentials: Complete Guide to Cargo Securement for Trucking Professionals
Introduction
Flatbed trailers are the workhorses of the transportation industry, tasked with hauling oversized, heavy, and irregularly shaped cargo—from steel beams and construction machinery to industrial equipment and raw materials. Unlike enclosed trailers, flatbeds offer no built-in protection or containment, making proper cargo securement not just a best practice, but a legal obligation and a critical safety imperative. A single mistake in tie-down procedures can lead to catastrophic accidents, costly cargo damage, DOT violations, or even loss of life.
This comprehensive guide is designed for trucking professionals—whether seasoned drivers, fleet managers, or new entrants to the field—who need to master the art and science of flatbed cargo securement. We’ll cover everything from federal regulations and essential equipment to step-by-step processes, common pitfalls, and maintenance protocols. By the end of this guide, you’ll have the knowledge and confidence to secure any flatbed load safely, legally, and efficiently.
Understanding Flatbed Regulations
Compliance with cargo securement regulations is non-negotiable for flatbed operators. In the United States, the primary authority governing these rules is the Federal Motor Carrier Safety Administration (FMCSA), under Title 49 of the Code of Federal Regulations (CFR), Part 393. These regulations are designed to prevent cargo shift, falling loads, and subsequent highway hazards.
Key Federal Requirements (FMCSA §393)
Aggregate Working Load Limit (WLL): The total WLL of all tie-downs used must be at least half the weight of the cargo being secured. For example, a 10,000-pound load requires tie-downs with a combined WLL of at least 5,000 pounds.
Minimum Number of Tie-Downs: The number of tie-downs depends on the length and weight of the cargo (§393.110):
1 tie-down for cargo ≤5 feet long and ≤1,100 pounds.
2 tie-downs for cargo ≤5 feet long but >1,100 pounds, or 5–10 feet long (any weight).
2 tie-downs for the first 10 feet of cargo >10 feet long, plus 1 additional tie-down for every 10 feet (or fraction thereof) beyond that.
Specific Cargo Rules: Certain commodities have specialized requirements. For example, metal coils weighing ≥5,000 pounds must be secured with diagonal and transverse tie-downs, plus blocking or friction mats to prevent longitudinal movement (§393.120).
Inspection Mandates: Drivers must inspect cargo and securement devices within the first 50 miles of a trip, then every 3 hours or 150 miles, and after every break (§393.103).
State and International Considerations
While FMCSA sets federal standards, individual states may have additional requirements—such as weight restrictions, tarping rules for loose materials, or specific tie-down standards for hazardous cargo. For cross-border hauls, operators must comply with Canadian (Transport Canada) or Mexican (Secretaría de Comunicaciones y Transportes) regulations, which often align with FMCSA rules but may have nuances (e.g., different WLL calculations or equipment certifications).
Consequences of Non-Compliance
Violations of FMCSA securement rules can result in:
Fines up to
13,000perviolation(forcarriers)or
2,750 (for drivers).
Out-of-service orders, forcing the vehicle to be grounded until violations are corrected.
Liability for damages or injuries caused by falling cargo.
Increased insurance premiums or loss of operating authority.
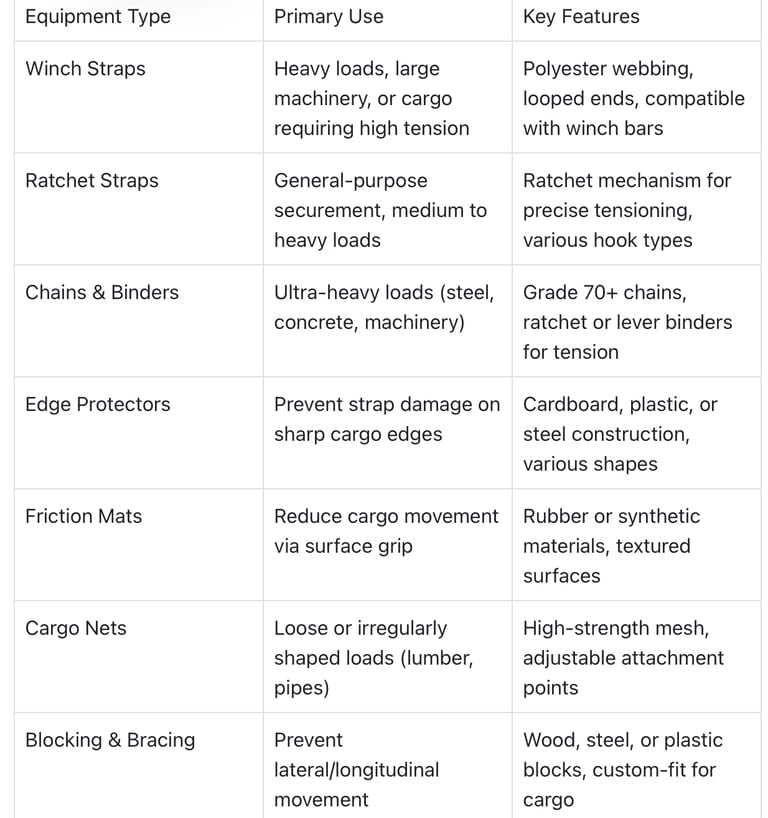
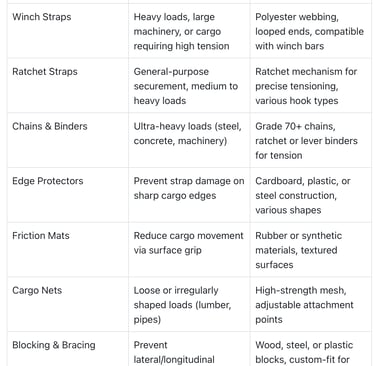
Essential Tie Down Equipment
The effectiveness of your cargo securement system depends on using the right tools for the job. Below is an overview of the core equipment every flatbed operator should have, along with their primary applications and key features.
Material Considerations
Polyester vs. Nylon: Polyester is the preferred material for straps due to its low stretch (4–7% elongation) and resistance to UV rays, moisture, and abrasion. Nylon offers higher stretch (15–20%) and shock absorption but is less durable in harsh weather.
Chain Grades: Grade 70 is the standard for transport chains (gold-chromated for identification) as it meets DOT requirements and offers a balance of strength and weight. Grades 80, 100, and 120 are higher-strength options for extreme loads but are heavier and more expensive.
Hardware Quality: All hooks, D-rings, and fittings must meet FMCSA standards and have a WLL rating matching the strap or chain they’re paired with. Weak hardware is a common failure point.
Winch Straps Guide
Winch straps are a staple for flatbed operators, designed to secure heavy or bulky cargo using a winch bar to create tension. When used correctly, they provide reliable holding power for loads like steel coils, construction equipment, and large crates.
Winch Strap Specifications
Width: Common widths are 2", 3", and 4". Wider straps distribute tension more evenly and have higher WLL (e.g., a 4" polyester winch strap typically has a WLL of 5,400–6,600 pounds).
Length: Available in 20' to 50' lengths. Longer straps are ideal for oversized cargo but require more storage space.
End Fittings: Most winch straps have a looped end (for attaching to the winch drum) and a hook (flat hook, wire hook, or grab hook) for connecting to the trailer’s anchor points.
WLL Rating: Always check the tag stitched into the webbing—never exceed the rated WLL. The breaking strength is typically 3x the WLL (e.g., a 5,000-lb WLL strap has a 15,000-lb breaking strength).
Proper Usage Steps
Inspect Before Use: Check for fraying, cuts, or damage to the webbing, hook, or loop. Discard any strap with visible wear.
Anchor the Strap: Attach the hook to a secure anchor point (stake pocket, rub rail, or D-ring) on the trailer. Ensure the hook is seated correctly to prevent slipping (flat hooks should be placed upside down on rub rails).
Thread the Winch: Feed the looped end through the winch drum, ensuring it’s wrapped evenly (no twists or overlaps).
Tension the Strap: Insert the winch bar into the winch mechanism and rotate clockwise to tighten. Apply steady pressure—avoid sudden jerks that can damage the strap or cargo.
Secure Excess Webbing: Roll up any loose webbing and secure it with zip-ties or the strap’s built-in loop to prevent flapping during transit.
Common Applications
Securing steel beams or pipes to the trailer deck.
Tying down heavy machinery (e.g., excavators, generators) that can’t be blocked easily.
Reinforcing other tie-downs for oversized loads.
Maintenance Tips
Avoid leaving winch straps on the winch drum when not in use—this causes premature wear from friction and exposure.
Clean straps with mild soap and water after use to remove dirt, grease, or chemicals.
Store in a dry, cool place (toolbox or storage bag) to protect from UV rays and moisture.
Replace straps every 1–2 years, or sooner if they show signs of damage.
Ratchet Straps for Flatbeds
Ratchet straps are the most versatile tie-down tool for flatbeds, offering precise tensioning and easy release. They’re suitable for a wide range of cargo, from medium-weight machinery to lumber and pallets.
Understanding Ratchet Strap Ratings
Working Load Limit (WLL): The maximum weight the strap can safely secure. Determined by the webbing material, width, and hardware. For example:
1" ratchet strap: WLL = 500–1,000 lbs (light-duty).
2" ratchet strap: WLL = 1,500–3,000 lbs (medium-duty).
3"–4" ratchet strap: WLL = 4,000–6,000 lbs (heavy-duty).
Breaking Strength: The load at which the strap will fail. As with winch straps, WLL is typically 1/3 or 1/4 of the breaking strength (check manufacturer specs).
Elongation: By law, ratchet straps can stretch no more than 7% of their length under full load. Polyester straps average 4% elongation, providing better load stability.
Types of Ratchet Straps
Standard Ratchet Straps: Used for most general cargo. Available with flat hooks, wire hooks, or D-rings.
High-Abrasion Straps: Thicker webbing with a protective coating, designed for sharp or rough cargo (e.g., steel, concrete) to prevent cutting.
Cam Buckle Straps: A lighter alternative to ratchet straps, using a cam mechanism for quick tensioning. Suitable for light-duty loads (≤1,000 lbs) that don’t require extreme tension.
Step-by-Step Usage
Inspect Equipment: Check for frayed webbing, bent hooks, or a malfunctioning ratchet mechanism. Ensure the WLL matches the load weight.
Position the Strap: Drape the strap over the cargo, ensuring it’s centered and not twisted. Avoid placing the strap over sharp edges (use edge protectors if needed).
Attach Hooks: Connect one hook to the trailer’s anchor point, then the other to the opposite side. Ensure hooks are fully engaged—flat hooks should seat on the inside of rub rails to prevent popping off.
Tension the Strap: Pull excess webbing through the ratchet to remove slack, then pump the ratchet handle up and down to tighten. Stop when the strap is firm—over-tightening can damage the cargo or strap.
Lock the Ratchet: Ensure the ratchet handle locks into place (you’ll hear a click). Secure excess webbing with zip-ties or the strap’s loop to avoid wind damage.
Release Procedure: To untighten, lift the ratchet handle to disengage the mechanism, then pull the release lever to feed out the webbing. Never yank the strap to release tension.
Common Mistakes to Avoid
Jamming the Ratchet: Failing to pull excess webbing through before tensioning can jam the mechanism. Always remove slack first.
Improper Hook Placement: Hooking flat hooks to the outside of rub rails increases the risk of slipping. Always place them inside.
Overloading: Exceeding the WLL is a major safety hazard. Use multiple straps for heavy loads.
Ignoring Edge Protection: Sharp cargo can cut webbing—always use edge protectors.
Chain and Chain Binders
For ultra-heavy or high-risk loads (e.g., steel coils, concrete panels, heavy machinery), chains and binders are the gold standard. They offer superior strength and resistance to abrasion, making them ideal for loads that would damage straps.
Chain Selection
Grades: Grade 70 is the most common for flatbed transport, with a WLL of 3,150–11,200 pounds (depending on size) and a gold-chromated finish for easy identification. Grade 80 (10,000–15,000 lbs WLL) and Grade 100 (15,000–20,000 lbs WLL) are used for extreme loads but require compatible binders.
Sizes: Common sizes are 3/8", 1/2", and 5/8". Larger chains have higher WLL but are heavier and harder to handle.
Link Type: Transport chains use clevis links (openable) for easy attachment to anchor points. Avoid using lifting chains (e.g., Grade 80) for transport unless they’re certified for cargo securement.
Binder Types
Binders (also called load binders) are used to tension chains. There are two main types:
Ratchet Binders: Use a ratcheting mechanism to apply tension gradually. They’re safer than lever binders because they reduce recoil risk. Ideal for precision tensioning and heavy loads.
Lever Binders (Snap Binders): Use a lever arm to create tension with a single pull. They’re faster but require more physical effort and carry a higher risk of recoil if the chain breaks. Only use lever binders if you’re trained in proper handling.
Proper Usage Guidelines
Match Chain and Binder Grades: Never use a binder with a lower WLL than the chain. For example, a Grade 70 chain requires a Grade 70 binder.
Inspect Before Use: Check chains for bent links, cracks, or wear. Inspect binders for damaged handles, malfunctioning mechanisms, or bent hooks.
Position the Chain: Wrap the chain around the cargo, ensuring it’s tight against the load. Avoid slack, as this reduces holding power.
Attach to Anchor Points: Connect one end of the chain to the trailer’s anchor point (stake pocket, D-ring, or chain slot). Ensure the hook is fully engaged.
Apply Tension with the Binder:
Ratchet Binder: Attach the binder between the two chain ends. Pump the ratchet handle to tighten until the chain is firm. Lock the handle in place.
Lever Binder: Hook the binder to both chain ends. Pull the lever down sharply to tension. Secure the lever with a safety pin to prevent accidental release.
Double-Check Tension: Give the chain a firm pull to ensure it’s secure. Add additional chains if the load is prone to shifting.
Safety Precautions
Wear Protective Gear: Always use gloves, safety glasses, and a hard hat when handling chains and binders—recoil from a broken chain can cause serious injury.
Avoid Over-Tensioning: Excessive tension can damage the cargo or chain. Tighten until the chain is snug, not stretched.
Secure Loose Ends: Use chain hooks or zip-ties to secure loose chain ends, preventing them from flapping during transit.
Inspect During Transit: Check chains and binders at each mandatory inspection stop (50 miles, 3 hours, etc.) to ensure they haven’t loosened.
Edge Protection
Edge protection is a critical but often overlooked component of cargo securement. Sharp edges on cargo (e.g., steel beams, lumber, metal coils) can cut or abrade straps and chains, leading to premature failure. Edge protectors distribute tension evenly and create a barrier between the cargo and the securement device.
Types of Edge Protectors
Cardboard/Angleboard: Made from recycled cardboard or laminated paperboard, these are lightweight, affordable, and eco-friendly. Suitable for non-abrasive cargo (e.g., lumber, pallets) and short hauls. Signode’s Angleboard® is a popular option, offering moisture resistance and three-sided protection.
Plastic Edge Protectors: Durable and water-resistant, plastic protectors are ideal for harsh weather or abrasive cargo. They come in L-shaped, U-shaped, or coil-specific designs (for metal coils).
Steel Edge Protectors: Heavy-duty and puncture-resistant, steel protectors are used for ultra-sharp cargo (e.g., steel coils, concrete panels) that would damage plastic or cardboard.
Rubber Edge Guards: Flexible and shock-absorbent, rubber protectors are suitable for irregularly shaped cargo or areas where the strap makes contact with curved edges.
Proper Placement
Corners: Place protectors on all sharp corners of the cargo where straps or chains make contact.
Lengthwise Edges: For long cargo (e.g., steel beams), place protectors every 2–3 feet along the edge to prevent strap wear.
Coil Cargo: Use OD (outer diameter) or ID (inner diameter) protectors designed to contour to the coil’s circumference, protecting both the cargo and the securement device.
Benefits of Edge Protection
Extends the life of straps and chains by reducing abrasion.
Prevents cargo damage (e.g., dents, scratches) from securement devices.
Ensures compliance with FMCSA regulations, which require protection for sharp-edged cargo.
Reduces the risk of strap failure and subsequent cargo shift.
Calculating Tie Down Requirements
To ensure compliance and safety, you must calculate the minimum number of tie-downs and their required WLL before securing your load. This process involves two key steps: determining the number of tie-downs and verifying the aggregate WLL.
Step 1: Calculate Minimum Number of Tie-Downs
Example: A 16-foot steel beam weighing 8,000 pounds requires 3 tie-downs (2 for the first 10 feet, 1 for the remaining 6 feet).
Step 2: Verify Aggregate Working Load Limit
The total WLL of all tie-downs must be at least half the weight of the cargo (FMCSA §393.106).
Formula: Aggregate WLL ≥ (Cargo Weight) × 0.5
Example: For an 8,000-pound load, the aggregate WLL of tie-downs must be ≥4,000 pounds. If using 3 ratchet straps each with a WLL of 1,500 pounds, the total is 4,500 pounds—meeting the requirement.
Step 3: Adjust for Special Cases
High-Center-of-Gravity Loads: Cargo with a high center of gravity (e.g., tall machinery) is prone to tipping. Add 1–2 extra tie-downs to prevent lateral movement.
Irregularly Shaped Cargo: Odd-shaped loads may require additional tie-downs to secure loose ends or protrusions.
Blocked Loads: If cargo is blocked by a header board, bulkhead, or other cargo, you may reduce the number of tie-downs for forward/rearward movement—but still need lateral tie-downs.
Tools for Calculation
FMCSA Cargo Securement Calculator: Available online, this tool helps determine tie-down requirements based on cargo dimensions and weight.
Load Planning Apps: Apps like Trucker Tools or LoadSecure offer tie-down calculators, compliance checks, and load planning features.
Manual Calculation: Keep a cheat sheet in your truck with the FMCSA tables and formula for quick reference.
Step-by-Step Securement Process
A systematic approach to cargo securement ensures consistency and compliance. Follow these steps for any flatbed load:
1. Pre-Load Preparation
Inspect the Trailer: Check the deck for damage (cracks, rust, loose bolts) and ensure anchor points (stake pockets, D-rings, rub rails) are secure.
Clean the Deck: Remove debris, oil, or grease to improve friction between the cargo and deck.
Gather Equipment: Collect all necessary tie-downs, edge protectors, friction mats, blocking, and tools. Verify WLL ratings match the load.
Plan the Load: Determine the optimal placement for balance (even weight distribution, low center of gravity) and access to anchor points.
2. Load Placement
Balance the Load: Distribute weight evenly across the trailer deck. Avoid overloading the front or rear axles—this can affect steering and traction.
Low Center of Gravity: Place heavier items on the bottom and lighter items on top to reduce rollover risk.
Secure Against Movement: Use blocking (wood, steel, or plastic) to prevent lateral or longitudinal movement. Blocking should be custom-fit to the cargo (e.g., chocks for wheels on machinery).
Friction Mats: Place friction mats under the cargo to increase grip—this reduces the need for excessive tie-down tension.
3. Apply Tie-Downs
Lateral vs. Longitudinal: Use lateral tie-downs (across the trailer) to prevent side-to-side movement and longitudinal tie-downs (along the trailer) to prevent forward/rearward movement.
Angle of Tension: Tie-downs should make a 30–45-degree angle with the deck for optimal holding power. Avoid angles greater than 45 degrees, as this reduces tension efficiency.
Edge Protection: Place edge protectors on all sharp corners before applying straps or chains.
Tension Gradually: Tighten tie-downs one at a time, alternating sides to ensure even tension. Avoid sudden jerks that can shift the cargo.
4. Final Inspection
Check Tension: Pull on each tie-down to ensure it’s firm. No slack should be visible.
Verify Anchor Points: Ensure hooks are fully engaged and anchor points are not damaged.
Secure Excess Webbing/Chain: Roll up loose material and secure with zip-ties or loops to prevent wind damage.
Document Compliance: Take photos of the secured load for your records (useful in case of DOT inspections or claims).
5. Post-Load Inspections
First 50 Miles: Stop and recheck tie-downs—cargo may shift during initial movement.
Regular Checks: Inspect every 3 hours or 150 miles, and after every break. Adjust tension as needed.
Extreme Weather: Increase inspection frequency during rain, snow, or high winds—these conditions can loosen tie-downs.
Securing Specific Cargo Types
Different cargo types require specialized securement methods. Below are best practices for common flatbed loads:
1. Steel Coils
Vertical Eyes: For coils with vertical eyes (holes), use at least two diagonal tie-downs across the eyes, one transverse tie-down over the top, and blocking/friction mats to prevent forward movement (FMCSA §393.120). Use coil edge protectors to prevent strap damage.
Horizontal Eyes: For coils with horizontal eyes, place them against a header board or other coils. Use chains to secure the ends and transverse tie-downs over the top.
Weight Consideration: Coils weighing ≥5,000 pounds require additional tie-downs—follow FMCSA’s specific rules for heavy coils.
2. Construction Machinery (Excavators, Bulldozers)
Block the Wheels: Use steel chocks on all wheels to prevent rolling. Secure chocks with chains or straps.
Secure the Frame: Attach tie-downs to the machine’s frame (not tires or attachments) using chains or heavy-duty ratchet straps. Use 4–6 tie-downs for large machinery.
Lower Attachments: Lower buckets, blades, or arms to reduce the center of gravity. Secure attachments with additional tie-downs.
3. Lumber and Building Materials
Bundle the Load: Use straps to bundle lumber into manageable sections (2–3 feet high) before securing to the trailer.
Edge Protection: Place cardboard or plastic edge protectors on the top and bottom of bundles to prevent strap damage.
Tie-Down Spacing: Use one tie-down every 10 feet of bundle length. For long loads, add lateral tie-downs to prevent side-to-side movement.
4. Concrete Panels
Vertical Placement: Stand panels upright against a header board or blocking. Use edge protectors between panels to prevent chipping.
Horizontal Placement: Lay panels flat, using blocking between layers to distribute weight. Secure with chains or heavy-duty straps across the top and sides.
Abrasion Protection: Use steel edge protectors—concrete is abrasive and can damage straps quickly.
5. Oversized Loads (Wide/High Cargo)
Permits: Obtain the necessary oversized load permits before transport.
Escort Vehicles: Use escort vehicles (front and rear) for loads exceeding legal width/height.
Additional Tie-Downs: Add extra tie-downs to secure protrusions. Use flags or lights to mark oversized portions.
Route Planning: Avoid low bridges, narrow roads, and sharp turns that could shift the load.
Tarps and Weather Protection
Tarps are essential for protecting cargo from weather damage (rain, snow, UV rays) and preventing loose materials (e.g., gravel, sand) from blowing off the trailer. Proper tarping also ensures compliance with state and federal rules for covering loads.
Types of Flatbed Tarps
Canvas Tarps: Durable and breathable, ideal for long hauls and heavy cargo. Resistant to tears and UV rays but heavier than synthetic options.
Polyester Tarps: Lightweight, water-resistant, and affordable. Suitable for most general cargo. Look for reinforced grommets and hemmed edges for durability.
Vinyl Tarps: Heavy-duty and waterproof, ideal for harsh weather or loose materials (e.g., gravel, mulch). Resistant to mildew and abrasion but heavier than polyester.
Conestoga Tarps: A rolling tarp system built into the trailer, offering full enclosure without manual tarping. Ideal for frequent loading/unloading and oversized cargo.
Tarping Steps
Inspect the Tarp: Check for holes, tears, or damaged grommets. Repair small holes with tarp tape—replace severely damaged tarps.
Position the Tarp: Drape the tarp over the cargo, ensuring it covers all sides and extends at least 6 inches over the trailer edges. Avoid leaving gaps.
Secure Grommets: Use bungee cords, ropes, or tarp straps to secure the tarp’s grommets to the trailer’s anchor points. Space fasteners every 1–2 feet for a tight fit.
Tension the Tarp: Pull the tarp tight to prevent wind flapping (which causes wear). Use ratchet straps for large tarps to ensure even tension.
Secure Loose Ends: Fold excess tarp material under the load or secure it with zip-ties to prevent wind damage.
Weather-Specific Tips
Rain/Snow: Use a waterproof tarp (vinyl or polyester) and ensure all seams are covered. Tension the tarp to prevent pooling water.
High Winds: Add extra fasteners and use heavier-duty tarps. Avoid overhanging material that can catch wind.
UV Exposure: Use UV-resistant tarps (canvas or treated polyester) to prevent cargo fading or damage. Cover sensitive materials (e.g., wood, metal) to avoid sun warping or rust.
Maintenance Tips
Clean After Use: Rinse tarps with water to remove dirt, salt, or chemicals. Allow to dry fully before storing.
Fold Properly: Fold tarps neatly to avoid creases and damage to grommets. Store in a dry, cool place (avoid direct sunlight).
Repair Promptly: Fix small tears or loose grommets with tarp repair kits to extend the tarp’s life.
Pre-Trip Inspection
A thorough pre-trip inspection is mandatory for compliance and safety. FMCSA requires drivers to inspect the trailer, cargo, and securement devices before every trip.
Trailer Inspection
Deck: Check for cracks, rust, or loose bolts. Ensure the deck is clean and free of debris.
Anchor Points: Inspect stake pockets, D-rings, rub rails, and chain slots for damage. Ensure they’re tight and secure.
Brakes and Lights: Verify brakes, turn signals, and taillights are working—damaged lights can lead to accidents or violations.
Tires: Check tire pressure, tread depth, and for signs of damage. Overloaded or underinflated tires increase rollover risk.
Cargo Inspection
Weight and Balance: Ensure the load is not overloaded and weight is evenly distributed. Check axle weights with a scale if possible.
Placement: Verify cargo is positioned correctly (low center of gravity, balanced) and blocked properly.
Damage: Inspect cargo for pre-existing damage—document with photos to avoid liability claims.
Securement Device Inspection
Straps: Check for fraying, cuts, or wear. Ensure WLL tags are visible and legible.
Chains: Inspect for bent links, cracks, or rust. Verify grade and WLL.
Binders: Check for malfunctioning mechanisms, bent hooks, or damaged handles.
Edge Protectors: Ensure they’re in place and undamaged.
Tarps: Inspect for holes, tears, or loose grommets.
Post-Inspection Documentation
Logbook Entry: Record the inspection in your logbook, noting any issues and corrective actions.
Photos: Take photos of the secured load, trailer, and equipment for compliance records.
Defect Reports: Report any trailer or equipment defects to your fleet manager immediately.
Common Mistakes
Even experienced drivers make mistakes—here are the most common errors in flatbed cargo securement and how to avoid them:
1. Underestimating Tie-Down Requirements
Mistake: Using too few tie-downs or tie-downs with insufficient WLL.
Consequence: Cargo shift, falling loads, DOT violations.
Solution: Always calculate the minimum number of tie-downs and aggregate WLL using FMCSA guidelines. Add extra tie-downs for high-risk loads.
2. Ignoring Edge Protection
Mistake: Securing sharp-edged cargo without edge protectors.
Consequence: Strap/chain damage, cargo shift, equipment failure.
Solution: Use edge protectors (cardboard, plastic, or steel) on all sharp corners and edges.
3. Improper Hook Placement
Mistake: Hooking flat hooks to the outside of rub rails or using damaged hooks.
Consequence: Hooks slip or fail, leading to cargo shift.
Solution: Place flat hooks on the inside of rub rails. Inspect hooks for damage before use.
4. Over-Tightening or Under-Tightening
Mistake: Over-tightening straps/chains (damaging cargo or equipment) or under-tightening (leaving slack).
Consequence: Cargo damage, strap failure, or shift.
Solution: Tighten until the strap/chain is firm—no slack, but not stretched. Use tension gauges for precision (optional).
5. Poor Load Balance
Mistake: Overloading one axle or placing cargo with a high center of gravity.
Consequence: Poor handling, rollover risk, axle damage.
Solution: Distribute weight evenly, place heavy items low, and avoid overloading axles.
6. Neglecting Post-Load Inspections
Mistake: Failing to recheck tie-downs after the first 50 miles or during the trip.
Consequence: Loose tie-downs, cargo shift, accidents.
Solution: Follow FMCSA inspection requirements—check every 3 hours, 150 miles, or after breaks.
7. Using Damaged Equipment
Mistake: Using frayed straps, bent chains, or malfunctioning binders.
Consequence: Equipment failure, cargo loss, accidents.
Solution: Inspect all equipment before use. Discard any damaged items—never attempt to repair a frayed strap or bent chain.
Tools Every Driver Needs
A well-equipped toolbox is essential for flatbed operators. Here’s a list of must-have tools to handle securement, maintenance, and emergencies:
1. Securement Tools
Tie-Downs: Assortment of ratchet straps (2"–4"), winch straps, and Grade 70 chains.
Binders: 2–4 ratchet binders and 1–2 lever binders (for heavy loads).
Edge Protectors: Cardboard, plastic, and steel protectors (various sizes).
Friction Mats: 2–3 large mats (4'x6' or larger) for improved grip.
Blocking & Bracing: Wood or steel blocks, wheel chocks, and bracing rods.
Cargo Nets: 1–2 large nets for loose or irregular cargo.
2. Hand Tools
Wrench Set: Combination and socket wrenches (metric and standard).
Pliers: Needle-nose, channel-lock, and locking pliers.
Screwdrivers: Flathead and Phillips (various sizes).
Hammer: Claw hammer for securing blocking.
Utility Knife: For cutting straps, tarps, or packaging.
Winch Bar: 2–3 winch bars (compatible with your winch straps).
Tension Gauge: Optional but useful for precise tensioning.
3. Safety Equipment
Reflective Vest: High-visibility vest for roadside inspections.
Hard Hat: For protection when handling heavy cargo.
Safety Gloves: Cut-resistant gloves for handling chains and straps.
Safety Glasses: To protect eyes from debris.
Road Flares/Reflective Triangles: For emergency stops.
Fire Extinguisher: Class ABC extinguisher (for fuel and electrical fires).
4. Maintenance Tools
Tarp Repair Kit: Tarp tape, patches, and grommet repair tools.
Strap Repair Kit: Webbing repair tape and stitching tools (for minor damage).
Lubricant: Silicone or chain lubricant for binders and winches.
Cleaning Supplies: Mild soap, brush, and rag for cleaning straps and tarps.
5. Emergency Tools
Flashlight: Heavy-duty LED flashlight (with extra batteries).
Jumper Cables: 20'–30' cables for battery emergencies.
Tire Pressure Gauge: For checking trailer tire pressure.
First Aid Kit: Comprehensive kit with bandages, antiseptic, and pain relievers.
Storage Tips
Use a heavy-duty metal toolbox (mounted to the trailer or truck) to keep tools organized and secure.
Label tools and equipment for easy access.
Restock supplies regularly—never run out of essential items like edge protectors or zip-ties.
Equipment Maintenance
Proper maintenance extends the life of your securement equipment, reduces costs, and ensures safety. Follow these maintenance guidelines:
1. Strap Maintenance
Cleaning: Rinse straps with mild soap and water after use. Remove dirt, grease, or chemicals to prevent degradation.
Drying: Allow straps to dry fully before storing—moisture causes mildew and weakens webbing.
Storage: Roll straps neatly and store in a dry, cool place (toolbox or storage bag). Avoid leaving straps on winch drums or exposed to sunlight.
Inspection: Check for fraying, cuts, or discoloration before each use. Discard straps with visible damage.
Replacement: Replace straps every 1–2 years, or sooner if used frequently or exposed to harsh conditions.
2. Chain Maintenance
Cleaning: Remove dirt and rust with a wire brush. Wash with mild soap and water, then dry thoroughly.
Lubrication: Apply chain lubricant to prevent rust and ensure smooth operation. Avoid over-lubricating—excess grease attracts dirt.
Storage: Hang chains or store in a dry container to prevent rust. Avoid stacking heavy objects on chains.
Inspection: Check for bent links, cracks, or rust. Replace any chain with damaged links—never use a chain with a broken link.
3. Binder Maintenance
Cleaning: Wipe binders with a rag to remove dirt and grease. Use a wire brush to clean the ratchet mechanism.
Lubrication: Lubricate the ratchet or lever mechanism with silicone or machine oil to prevent seizing.
Inspection: Check for bent hooks, damaged handles, or malfunctioning mechanisms. Ensure the ratchet locks securely.
Replacement: Replace binders if the mechanism fails or hooks are bent.
4. Tarp Maintenance
Cleaning: Rinse tarps with water after use. For heavy dirt, use mild soap and a soft brush. Avoid harsh chemicals that damage the material.
Drying: Hang tarps to dry fully before folding—moisture causes mildew and rot.
Storage: Fold tarps neatly and store in a dry, cool place. Avoid storing in direct sunlight (UV rays degrade the material).
Repair: Fix small tears with tarp tape or patches. Replace tarps with large holes or damaged grommets.
5. Routine Checks
Weekly: Inspect all equipment for damage, wear, or rust.
Monthly: Clean and lubricate chains, binders, and winches.
Quarterly: Replace any equipment showing signs of excessive wear (even if not yet damaged).
FAQ
Q1: What’s the difference between WLL and breaking strength?
A: Working Load Limit (WLL) is the maximum weight a tie-down can safely secure during normal use. Breaking strength is the load at which the tie-down will fail. WLL is typically 1/3 or 1/4 of the breaking strength (e.g., a strap with a 15,000-lb breaking strength has a 5,000-lb WLL). Never exceed the WLL—this is a critical safety violation.
Q2: Can I mix different types of tie-downs (e.g., straps and chains) for the same load?
A: Yes, as long as the aggregate WLL meets the requirement (half the cargo weight) and each tie-down is appropriate for the load. For example, you can use chains for heavy parts of the load and ratchet straps for lighter sections. Just ensure all equipment is in good condition and properly rated.
Q3: Do I need to tarp every flatbed load?
A: No—tarping is required only for loads that are prone to blowing off (e.g., gravel, sand, lumber) or sensitive to weather (e.g., wood, metal, electronics). Check state and federal rules—some states require tarping for all loose materials. Even if not required, tarping can prevent cargo damage and reduce liability.
Q4: How often should I replace my tie-down straps?
A: Replace straps every 1–2 years, or sooner if:
They show signs of fraying, cuts, or discoloration.
The webbing is stiff or brittle (from UV exposure).
The hardware (hooks, ratchet) is damaged or malfunctioning.
They’ve been used to secure extremely heavy or abrasive cargo (e.g., steel coils) frequently.
Q5: What should I do if a tie-down fails during transit?
A: Pull over to a safe location (off the highway if possible) immediately. Secure the load with spare tie-downs (always carry extras) or rearrange the cargo if necessary. Do not continue driving with a failed tie-down—this is a safety hazard and a DOT violation. Inspect the remaining tie-downs for damage before resuming travel.
Q6: Are there any exceptions to FMCSA tie-down requirements?
A: FMCSA rules apply to all commercial motor vehicles transporting cargo on flatbed trailers. Exceptions are rare but may include:
Cargo that is blocked by a bulkhead or other cargo and cannot move.
Small loads (≤1,100 lbs and ≤5 feet long) that require only one tie-down.
Emergency shipments (e.g., disaster relief) where compliance is impractical—but you must document the emergency and take reasonable precautions.
Q7: Can I use homemade blocking or edge protectors?
A: Homemade blocking (e.g., scrap wood) is acceptable as long as it’s strong enough to prevent cargo movement. Homemade edge protectors (e.g., folded cardboard) are also allowed for light-duty cargo. However, for heavy or abrasive loads, use commercial edge protectors (plastic or steel) to ensure reliability.
Conclusion
Flatbed cargo securement is a critical skill for trucking professionals—one that requires knowledge of regulations, proper equipment usage, and attention to detail. By following the guidelines outlined in this guide, you can ensure your loads are secured safely, legally, and efficiently, reducing the risk of accidents, violations, and cargo damage.
Remember, compliance with FMCSA regulations is non-negotiable, but safety should always be your top priority. Invest in high-quality equipment, inspect it regularly, and never cut corners—even for a “quick trip.” A well-secured load not only protects you and other drivers on the road but also safeguards your reputation as a professional operator.
Whether you’re hauling steel coils, construction machinery, or lumber, the principles of cargo securement remain the same: balance the load, use the right equipment, apply sufficient tension, and inspect rigorously. By mastering these essentials, you’ll become a more confident and competent flatbed driver, capable of handling any load with ease.
Haul safe, stay compliant, and keep the roads safe for everyone.
Subscribe to our newsletter