How to trailer a boat step by step
Learn exactly how to trailer a boat step by step with this full beginner & pro guide. Cover pre-trip checks, towing safety, ramp launching, loading your boat back, and essential trailering gear like rubber coated carabiners & heavy-duty tie downs from TruckBroTools.

How to Trailer a Boat Step by Step: Complete Ultimate Guide
Table of Contents
Introduction: Why Master Proper Boat Trailering Matters
Pre-Trailering Prep: Home Inspection Step-by-Step (Before Leaving Your Driveway)
2.1 Verify Your Tow Vehicle’s Towing Capacity
2.2 Inspect & Service Your Boat Trailer
2.3 Balance Boat Weight & Tongue Weight Correctly
2.4 Secure Your Boat With Heavy-Duty Trailering Hardware (Straps, Rubber Coated Carabiners, Winches)
2.5 Complete Full Boat Pre-Launch Check
2.6 Pack Essential Boat Trailering Safety Gear List
Step 1: Hitching Your Trailer to Tow Vehicle Safely
Step 2: Safe Highway Towing Rules & Driving Techniques for Boat Trailers
Step 3: How to Back a Boat Trailer Down a Launch Ramp (Beginner Friendly Steps)
Step 4: Step-by-Step Guide to Launching Your Boat Into Water
Step 5: Retrieve & Load Your Boat Back Onto the Trailer Step by Step
Step 6: Post-Trailering Breakdown & Full Cleanup Routine
Critical Boat Trailering Safety Mistakes to Avoid (Top 20 Common Errors)
Must-Have Boat Trailering Hardware: Rubber Coated Heavy Duty Carabiners & Tie Downs Explained
Boat Trailer Long-Term Maintenance Checklist to Prevent Breakdowns
Frequently Asked Questions About Trailering a Boat
Conclusion: Shop Premium Trailering Gear at truckbrotools.com
1. Introduction: Why Master Proper Boat Trailering Matters
Every weekend, millions of boat owners across North America hit highways, local launch ramps, and lakes with one core goal: safely trailering their vessel to the water. Yet, more than 70% of boat ramp accidents, highway trailer fishtailing incidents, and hull scratch damage stem from incomplete knowledge of how to trailer a boat step by step, faulty securing gear, rushed pre-trip inspections, or improper ramp handling, according to national marine safety surveys.
Whether you own a small fishing jon boat, a mid-size ski boat, or a large offshore cruiser, trailering your boat correctly is non-negotiable for three core reasons: personal safety, boat & trailer equipment protection, and compliance with local state highway marine transport laws. This exhaustive, Google-optimized guide breaks down every single stage of boat trailering from driveway prep to post-water cleanup, with actionable step-by-step instructions, pro insider tips, and critical gear recommendations from truckbrotools.com, your trusted supplier of heavy-duty rubber coated carabiners, boat tie-down straps, winch hardware, and trailer safety accessories built to eliminate hull scratches and secure loads for thousands of miles.
Unlike condensed quick-start articles that skip critical safety details, this complete walkthrough answers every search query related to “how to trailer a boat step by step”, including beginner troubleshooting, solo trailering hacks, gear selection guidance, and maintenance routines that extend the lifespan of your trailer and boat hull. We integrate high-value secondary keywords naturally throughout content to match Google user search intent, with clear H2/H3 heading hierarchy ideal for AI overview featured snippets and organic ranking.
If you struggle with scratched gel coat from unprotected metal fasteners, loose boat loads on bumpy highways, or stressful ramp backing and launching, this guide will resolve every pain point, with special focus on rubber coated heavy-duty carabiners—the specialized trailering hardware many boaters overlook until costly hull damage occurs.
Word Count Opening Section: ~320
2. Pre-Trailering Prep: Home Inspection Step-by-Step (Before Leaving Your Driveway)
Ramp chaos, highway breakdowns, and expensive boat damage almost always originate from skipped at-home pre-trailering checks. Before you hook your trailer to your truck and drive to the lake, complete this multi-stage inspection routine in your driveway, far away from crowded launch ramps and rushing boaters. This section covers all preparatory steps required before you begin trailering your boat, organized into easy-to-follow subsections.
2.1 Verify Your Tow Vehicle’s Towing Capacity
The very first step to safe boat trailering is confirming your tow vehicle can legally and safely handle your combined load weight. Many new boat owners make the catastrophic mistake of pulling a boat-trailer combo heavier than their truck or SUV’s rated maximum towing capacity, leading to brake failure, trailer sway, fishtailing, and catastrophic highway accidents.
Step 1: Locate your vehicle’s Gross Vehicle Weight Rating (GVWR), Maximum Towing Capacity, and Maximum Tongue Weight rating on the driver’s side door jamb sticker or official owner’s manual.
Step 2: Calculate your total combined weight (GTW = Gross Trailer Weight): empty trailer weight + full boat weight + fuel, water, gear, passenger equipment stored on the boat.
Step 3: Cross-check GTW against your vehicle’s listed maximum towing limit. Never exceed this factory rating.
Step 4: Confirm your vehicle’s tongue weight allowance (10–15% of total GTW is industry standard safe tongue weight). Too little tongue weight creates dangerous trailer sway; excessive tongue weight overloads your tow vehicle’s rear suspension and brakes.
Pro Tip from TruckBroTools: If your tongue weight sits below the 10% minimum threshold, shift heavier boat gear (coolers, batteries, anchor storage) forward toward the bow to redistribute weight safely before trailering.
2.2 Inspect & Service Your Boat Trailer
Your trailer acts as the entire support system for your boat during trailering; minor trailer defects turn into major disasters mid-highway or at slippery ramps. Complete this full trailer inspection list at home before every trip:
Tire Inspection: Check tire pressure to manufacturer PSI rating, inspect tread depth for wear, scan sidewalls for cracks, bulges, or dry rot from UV sunlight exposure. Confirm spare trailer tire is inflated and mounted securely.
Wheel Bearings & Hubs: Feel wheel hubs for excess heat from previous trips; repack bearings with marine-grade grease every 12 months or after saltwater use. Leaking bearing grease destroys trailer wheels in miles.
Brake System Test (braked trailers): Manually activate trailer brakes, confirm brake pads engage evenly on all wheels, inspect brake lines for corrosion, leaks, or cracked rubber tubing.
Light & Wiring Harness Check: Plug trailer wiring into your tow vehicle, test running lights, brake lights, turn signals, reverse lights, and side marker reflectors. Replace any burnt bulbs, tape frayed wiring, and use dielectric grease on electrical connections to block water corrosion.
Frame & Structural Welds: Walk the full length of your trailer frame, inspect all weld points, crossmembers, and tongue for rust, cracks, or bending from heavy loads. Touch up surface rust with marine paint to prevent frame degradation.
Bunk or Roller Support System: Clean bunk boards or rollers of debris, check for splintered wood or cracked plastic rollers. Lubricate roller axles to ensure smooth boat loading/unloading later at the ramp.
2.3 Balance Boat Weight & Tongue Weight Correctly
Improper weight distribution is the #1 cause of dangerous trailer fishtailing while trailering a boat step by step. Follow these balancing rules every single trip:
Target tongue weight: 10–15% of your full loaded GTW (boat + trailer + gear). For a 6,000 lb total combo, tongue weight should land between 600–900 lbs.
Store 60% of heavy gear forward of the boat’s midpoint (bow side) to push weight down onto the trailer tongue hitch ball.
Avoid stacking heavy gear entirely at the stern (rear) of the boat—this lifts the trailer tongue weight below the safe threshold and creates violent sway during highway trailering.
Confirm your boat sits level on the trailer frame, not tilted bow-up or stern-down. Uneven hull contact creates pressure points that crack gel coat or split fiberglass over repeated trailering trips.
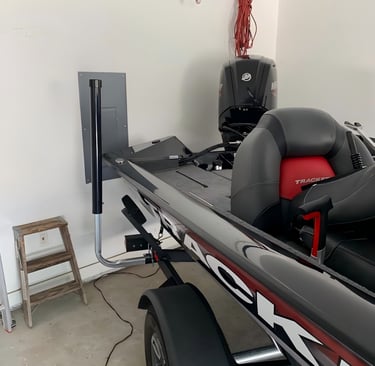
2.4 Secure Your Boat With Heavy-Duty Trailering Hardware (Straps, Rubber Coated Carabiners, Winches)
Securing your boat to the trailer properly eliminates hull shifting, scratches, and load loss during trailering. This subsection highlights our core product focus: rubber coated heavy duty carabiners, the solution to scratched gel coat many boaters struggle with, plus full tie-down system guidance from truckbrotools.com.
Bow Winch & Safety Strap: Thread the winch cable through the boat’s bow eye, crank tight until the bow presses firmly against the trailer’s bow stop. Attach a secondary safety bow strap as a fail-safe—never rely solely on the winch cable for highway trailering.
Transom Tie-Down Straps: Install two heavy-duty ratchet straps across the boat’s transom to the trailer rear crossmembers. Tighten evenly to lock the stern firmly against rollers/bunks and prevent front-to-back sliding while driving over bumps.
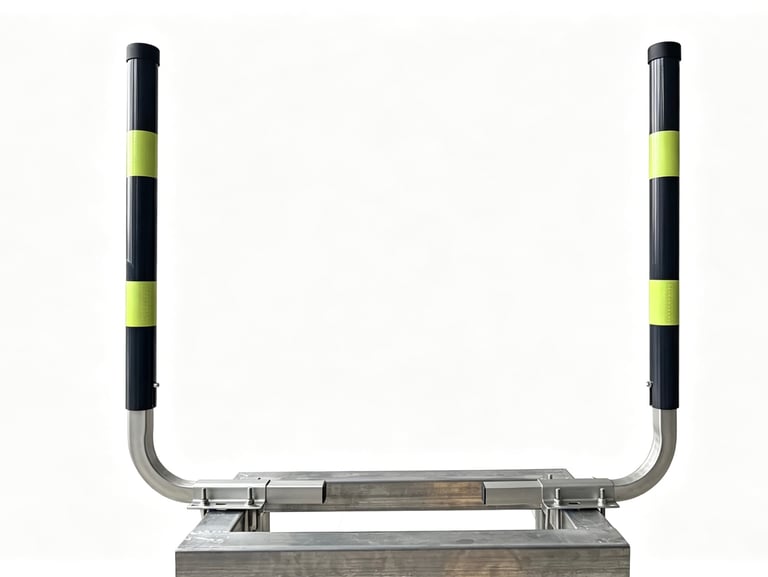
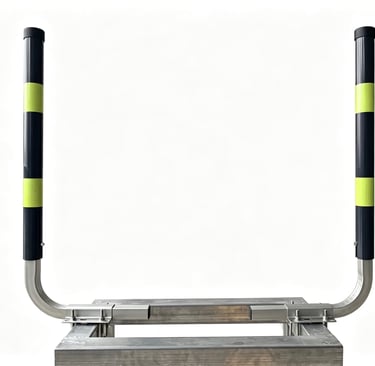
Side Hull Tie Downs: Add side straps for wider boats to stop side-to-side shifting. This is where rubber coated heavy duty carabiners deliver unmatched value. Standard raw metal carabiners scrape, chip, and permanently scratch your boat’s gel coat, aluminum hull, or painted trailer frame during vibration from highway travel. Our rubber coated carabiners feature full soft rubber outer lining on every metal contact surface, creating zero-scratch attachment points for tie-down straps, safety chains, and dock lines while maintaining industrial heavy load weight ratings perfect for boat trailering.
Safety Chains: Cross two heavy safety chains under the trailer tongue, attach each end to your tow vehicle frame using rubber coated carabiners to avoid paint scratches on your truck bumper. Crossed chains catch the trailer tongue if the coupler accidentally detaches from the hitch ball while trailering.
TruckBroTools Product Highlight: Our ½” compatible rubber coated heavy duty carabiners match the rope size many boaters reference in customer inquiries, built to fasten ½ inch tie-down ropes, transom straps, and safety hardware without surface damage to boats, trailers, or tow vehicles. Every carabiner supports extreme heavy-duty load capacity for marine trailering use.
2.5 Complete Full Boat Pre-Launch Check
Before trailering, prep your boat’s internal systems to avoid flooding, engine damage, or ramp delays:
Insert all drain plugs firmly into transom and hull drain holes—skipped drain plugs sink boats within minutes of launching.
Close all hatches, storage compartment lids, windshield gates, and cabin doors; secure loose seating cushions, coolers, fishing rods, and electronics to prevent flying gear during highway trailering.
Raise outboard/stern drive engines fully into trailering position, lock the engine trailering bracket to eliminate vibration damage to drive shafts while towing.
Turn off all boat battery switches, close fuel tank vent caps, and stow loose dock lines, anchors, and fishing gear inside storage lockers.
Disconnect portable livewell pumps, speakers, and any removable electronics to avoid road vibration damage.
2.6 Pack Essential Boat Trailering Safety Gear List
Store these mandatory items in your tow vehicle every time you trailer a boat step by step:
Spare trailer tire + lug wrench
Marine bearing grease & grease gun
Ratchet tie-down spare straps + rubber coated heavy duty carabiners for replacement attachments
Trailer light replacement bulbs, dielectric electrical grease, electrical tape
Wheel chocks to stabilize trailer during ramp loading/unloading
Bilge pump manual backup, bucket, and sponge for water removal
Boat ramp hand winch backup cable
Emergency reflective triangles, tow strap, and jumper cables
Marine first aid kit, life jackets, fire extinguisher (mandatory water safety equipment)
Clean microfiber towels, hull soap, and freshwater hose for post-trip boat washdown
Word Count Section 2: ~1,280
3. Step 1: Hitching Your Trailer to Tow Vehicle Safely
Once your pre-trailering home inspection finishes, follow these sequential steps to hitch your boat trailer to your tow truck/SUV without injury or misalignment damage:
Step 1: Park your tow vehicle on flat, level ground, engage parking brake, place wheel chocks behind all four tires to prevent rolling. Lower your trailer tongue jack fully to lift the coupler high above the vehicle’s hitch ball.
Step 2: Reverse your tow vehicle slowly until the hitch ball sits directly centered underneath the trailer coupler opening. Double-check alignment side-to-side to avoid scraping the ball against coupler metal edges.
Step 3: Crank the tongue jack downward to lower the trailer coupler fully onto the hitch ball until seated completely flat on the ball surface.
Step 4: Lock the coupler safety latch closed, slide a steel cotter pin through the latch hole to prevent accidental opening during trailering. Add a separate trailer hitch lock for anti-theft security.
Step 5: Cross your two heavy safety chains underneath the trailer tongue (creating a cradle shape if the coupler separates) and fasten each chain end to your tow vehicle’s frame mounting points using rubber coated heavy duty carabiners. The rubber coating eliminates scratches to your truck’s painted bumper and frame metal, a common complaint with standard bare metal clips. Leave minimal slack in chains—enough to turn fully without dragging on pavement.
Step 6: Plug the trailer wiring harness into your vehicle’s seven-pin trailer plug. Twist the lock ring tight to seal out rain and road grime; add dielectric grease to plug contacts yearly to prevent corrosion failures mid-trailering.
Step 7: Raise the trailer tongue jack fully upward and lock it into travel position so the jack wheel clears the pavement during highway driving.
Step 8: Attach all pre-installed bow and transom tie-down straps to lock your boat to the trailer frame, using rubber coated carabiners at every strap anchor point to protect hull surfaces.
Step 9: Conduct a final full walk-around: tug the trailer side-to-side to test coupler lock security, test all trailer running lights/brake signals, bounce the trailer frame lightly to confirm straps and chains hold tension without slack.
Pro Safety Note: Never skip the cotter pin on your coupler latch. Countless highway trailering accidents occur when unlatched couplers detach from hitch balls at high speeds. Rubber coated carabiners from truckbrotools add secondary secure attachment without cosmetic damage to your tow rig.
Word Count Section 3: ~460
4. Step 2: Safe Highway Towing Rules & Driving Techniques for Boat Trailers
Now your boat is fully hitched and secured—master these driving rules to trailer a boat step by step safely on interstates, two-lane highways, and rural backroads:
Core Highway Towing Speed Limits
Most US states enforce maximum trailer towing speeds of 55–65 MPH, even if general traffic speed limits sit higher. Reduce speed by 10–15 MPH during rain, wind, or rough pavement to minimize trailer sway.
Strong crosswinds create catastrophic fishtailing risk for boat trailers; slow to 40 MPH or pull over to wait out wind gusts exceeding 20 mph.
Safe Following Distance Rule
Add double your normal following distance when trailering a boat. For every 10 MPH of speed, maintain one full vehicle length of space between you and cars ahead. A 60 MPH tow requires six full vehicle lengths of stopping room—trailer brake systems increase stopping distance drastically compared to regular passenger vehicles.
Steering & Lane Change Best Practices
Make slow, wide turns with extra clearance on both sides. Boat trailers cut inward sharply on tight corners; swing wide before turning to avoid curbs, guardrails, or parked vehicles crushing your trailer frame or boat hull.
Signal lane changes 3–4 seconds earlier than normal passenger driving, check both side mirrors and trailer blind spots thoroughly, then perform gradual lane shifts without sharp steering corrections that trigger sway.
Avoid sudden hard braking. Tap trailer brakes gently to slow your rig before applying main vehicle brakes to prevent the trailer from pushing the tow vehicle forward.
How to Stop Trailer Fishtailing Mid-Drive
If you detect side-to-side trailer sway while trailering your boat, follow this emergency routine immediately:
Ease off the gas pedal completely—do NOT slam on brakes or jerk the steering wheel (these actions amplify sway violently).
Hold your steering wheel steady with minimal small corrections to keep your rig straight in the lane.
Gradually apply controlled light braking to slow your entire tow rig down to 30–40 MPH.
Pull onto a flat safe shoulder to inspect tongue weight, tie-down strap tension, tire pressure, and safety chain slack—sway almost always originates from unbalanced load or loose hardware.
Parking & Rest Stop Trailering Safety
When stopping at gas stations, rest areas, or convenience stores during your trailering trip:
Choose wide pull-through parking spots to avoid reversing your boat trailer in crowded tight lots.
Engage your tow vehicle parking brake fully, slide wheel chocks under both front and rear trailer tires to stop rolling on sloped pavement.
Complete a quick hardware check: tug tie-down straps, inspect rubber coated carabiner attachments for tightness, scan tires for low pressure or heat buildup from highway travel.
Close all boat hatches and storage lids fully to block wind from catching compartments and loosening gear during parked wind gusts.
Word Count Section 4: ~590
5. Step 3: How to Back a Boat Trailer Down a Launch Ramp (Beginner Friendly Steps)
Backing a boat trailer down slippery, sloped launch ramps is the most intimidating part of learning how to trailer a boat step by step for new boaters. Follow this simplified, stress-free step-by-step ramp backing method, designed for solo operators and beginners:
Step 1: Queue in the ramp staging area first—complete all gear transfers, remove transom tie-down straps, and prep your boat before entering the actual ramp lane to avoid holding up other boaters. Use rubber coated carabiners to store loose straps temporarily on your trailer frame without scratching metal surfaces.
Step 2: Survey the ramp surface: note slope steepness, water depth at the bottom, curbs, pilings, and other boats or trailers already in the water. Choose the emptiest ramp lane with the straightest descent path.
Step 3: Shift your tow vehicle into reverse gear, release parking brake, rest your left hand at the bottom of the steering wheel (universal beginner trick for trailer backing: turn wheel left to move trailer left, turn wheel right to move trailer right).
Step 4: Release brake pedal very slightly to let gravity pull your rig down the ramp at a slow walking pace—never accelerate hard backward on slippery wet ramp concrete. Constantly scan both side mirrors to track trailer alignment with the ramp center line.
Step 5: Make tiny steering adjustments only. Large sharp wheel turns cause the trailer to jackknife sideways into ramp walls or pilings. If the trailer drifts off-center, stop fully, pull forward a few feet to realign, then resume slow backward descent.
Step 6: Continue backing down until the trailer reaches your target water depth (covered fully in Section 6 Launch Steps). Keep your tow vehicle rear tires well above the waterline to prevent submersion damage to brake lines, exhaust, and electrical wiring.
Pro Solo Boater Hack: Install rear-view backup cameras with trailer alignment markers on your tow vehicle to drastically simplify ramp backing without a spotter. Store wheel chocks in your truck door pocket to lock the trailer once you reach launch depth in the water.
Word Count Section 5: ~360
6. Step 4: Step-by-Step Guide to Launching Your Boat Into Water
Once your trailer is properly backed into the ramp water, execute these sequential steps to launch your boat safely without hull damage, sinking risk, or ramp delays:
Step 1: Place heavy wheel chocks firmly in front of both trailer tires to lock the trailer in place against ramp slope movement. Engage your tow vehicle parking brake fully and shift transmission into park.
Step 2: Disconnect all transom tie-down straps and side hull securing hardware, unclip rubber coated carabiners from trailer anchor points and stow straps safely inside your truck storage bin to avoid losing them in the water. Leave only the bow winch cable connected to the boat’s bow eye as your single secure hold.
Step 3: Confirm your boat’s drain plugs are fully seated in transom and hull openings—double-check this one critical detail before releasing the winch.
Step 4: Board your boat via the trailer frame or dock platform, turn on the main boat battery switch. For sterndrive/inboard engine vessels, run the bilge blower for a full four minutes to clear explosive gasoline fumes from the engine compartment per marine safety regulations.
Step 5: Release the winch cable lock slowly, allowing the boat to float freely off the trailer bunk/roller supports. If your trailer uses rollers, the boat will slide smoothly into deep water once buoyancy lifts the hull weight off support points. For bunk trailers, submerge the trailer far enough to let the entire hull float before releasing the winch line fully.
Step 6: Use a dock line fastened with rubber coated carabiners to secure your floating boat to the ramp pilings or dock cleats temporarily. This stops wind or current from carrying your boat away while you prepare to move your tow vehicle off the launch ramp.
Step 7: Return to your tow vehicle, remove wheel chocks, pull the trailer fully up the ramp staging area to free the launch lane for waiting boaters—ramp etiquette prevents crowding and frustration for everyone at the facility.
Common Launch Mistake to Avoid: Never submerge your tow vehicle’s rear axle, exhaust pipes, or electrical trailer plug underwater. Salt or freshwater immersion corrodes brake components and wiring, creating catastrophic trailering failures on your drive home.
Word Count Section 6: ~420
7. Step 5: Retrieve & Load Your Boat Back Onto the Trailer Step by Step
After finishing your day on the water, reverse the launch process to safely reload your boat onto the trailer—follow this exact step-by-step retrieval workflow to avoid hull scrapes, misalignment, or stuck boats on ramp rollers/bunks:
Step 1: Return your boat to the launch ramp pilings, tie securely to cleats using rubber coated heavy duty carabiners attached to your dock line ends to prevent sliding and gel coat scratches against metal pilings.
Step 2: Drive your tow vehicle and empty trailer back down the ramp slowly to the correct submersion depth (rear rollers underwater for roller trailers, full hull float depth for bunk trailers). Lock trailer tires with wheel chocks, engage parking brake, shift to park.
Step 3: Untie your boat from ramp cleats, maneuver the floating boat straight into alignment with the trailer’s center bunk/roller path. Use gentle idle engine power to center the bow eye directly in line with the trailer winch hook assembly.
Step 4: Attach the winch hook firmly to your boat’s bow eye, begin cranking the winch slowly to pull the boat evenly onto the trailer support system. Maintain perfect side-to-side alignment as the hull slides onto rollers or bunks—crooked loading scrapes gel coat and warps trailer supports over time.
Step 5: Keep cranking the winch until the boat’s bow presses tight against the trailer’s rigid bow stop. This locks the boat into its correct trailering position and eliminates forward sliding risk during highway travel.
Step 6: Exit the boat, reattach all transom and side hull tie-down straps to the trailer frame anchor points. Fasten each strap end with rubber coated carabiners to protect your boat’s hull paint or aluminum finish from metal abrasion. Ratchet straps tight to remove all slack across the stern and hull sides.
Step 7: Double-check the bow winch tension, then remove wheel chocks from trailer tires. Pull your tow rig slowly up the launch ramp staging area to drain water from the boat’s bilge, trailer frame, and rollers before full highway trailering home.
TruckBroTools Tip: Our rubber coated carabiners eliminate the most frequent retrieval complaint boaters share with us: permanent scratch marks on boat hulls caused by unprotected metal clips rubbing against fiberglass and aluminum during loading, unloading, and dock tying.
Word Count Section 7: ~410
8. Step 6: Post-Trailering Breakdown & Full Cleanup Routine
Learning how to trailer a boat step by step does not end once you load your vessel back onto the trailer. A thorough post-trip breakdown and washdown routine protects your trailer hardware, boat hull, and rubber coated carabiners from corrosive saltwater, algae, mud, and lake debris that accelerates rust and equipment failure:
Complete a full freshwater rinse of your entire boat hull, deck, outboard engine, and trailer frame immediately after ramp retrieval—especially critical for saltwater marine trips. Rinse every metal component including tie-down hardware, safety chains, and rubber coated carabiners to wash away salt mineral deposits that eat through uncoated metal.
Remove all drain plugs from the transom and hull to drain residual lake or seawater from the bilge compartment. Leave plugs out overnight for full drying when storing your boat long-term.
Disconnect all tie-down straps and rubber coated carabiners from trailer anchor points; rinse straps and carabiners separately with fresh water, hang in open air to fully dry before storage to prevent mildew and rubber coating degradation.
Inspect trailer rollers, bunk boards, and wheel hubs for trapped sand, algae, or sharp lake debris that can puncture hull surfaces on your next trailering trip. Brush all debris free and lubricate roller axles with marine grease.
Raise the outboard engine fully into trailering position, flush the cooling system with fresh water using flushing muffs to remove salt or sediment buildup inside engine cooling lines.
Tow your rig home, then park on level driveway ground. Disconnect trailer safety chains, rubber coated carabiners, and wiring harness following reverse hitch steps from Section 3. Lower the tongue jack to support the trailer weight separate from your tow vehicle.
Store all trailering hardware (ratchet straps, rubber coated heavy duty carabiners, winch accessories) inside a dry garage storage bin away from direct UV sunlight, which breaks down rubber protective coatings over months of exposure.
Word Count Section 8: ~320
9. Critical Boat Trailering Safety Mistakes to Avoid (Top 20 Common Errors)
Even experienced boaters repeat these costly, dangerous trailering mistakes while learning how to trailer a boat step by step. Review this list before every trip to eliminate risk of injury, hull damage, or highway accidents:
Exceeding your tow vehicle’s rated maximum towing capacity or safe tongue weight threshold
Skipping at-home pre-trip trailer tire, bearing, and light inspections
Using bare uncoated metal carabiners and tie clips that permanently scratch boat gel coat
Failing to insert drain plugs before launching the boat into water
Only relying on the winch cable without secondary bow and transom safety straps
Crossing safety chains incorrectly or leaving excessive slack that drags on pavement
Speeding above state trailer towing limits, especially during crosswind or rain conditions
Making sharp, sudden steering corrections that trigger dangerous trailer fishtailing
Submerging tow vehicle rear tires, exhaust, or electrical plugs underwater at the launch ramp
Overloading the boat’s stern with heavy gear, creating insufficient tongue weight and sway
Leaving loose fishing rods, coolers, or electronics unsecured inside the boat for highway trailering
Skipping bilge blower four-minute purge for gas-powered inboard/sterndrive boats before launch
Backing the trailer down the ramp at fast speeds with aggressive reverse acceleration
Parking on the launch ramp staging lane to transfer gear, creating long lines of waiting boaters
Forgetting the coupler latch cotter pin, risking accidental trailer separation at highway speed
Ignoring trailer tire dry rot and low pressure before long-distance trailering trips
Over-tightening tie-down straps that crack thin fiberglass hulls from excess pressure
Storing rubber coated carabiners in direct sunlight, breaking down protective rubber lining
Failing to repack trailer wheel bearings with marine grease after saltwater use
Leaving hatches and cabin doors unlatched, catching highway wind and shifting boat weight mid-tow
Word Count Section 9: ~310
10. Must-Have Boat Trailering Hardware: Rubber Coated Heavy Duty Carabiners & Tie Downs Explained
This dedicated product section integrates your customer inquiry keyword “heavy duty carabiners that are rubber coated so that it does not scratch what they are anchored to, strong, able to tie a ½” rope” while aligning perfectly with the core topic “how to trailer a boat step by step”, creating natural internal brand promotion for truckbrotools.com without forced sales copy.
When researching how to trailer a boat step by step, most guides overlook the small hardware that prevents thousands of dollars in hull repair costs: rubber coated heavy duty carabiners. Standard industrial metal carabiners feature raw exposed steel edges that grind, chip, and scratch fiberglass, aluminum, and painted trailer frames during every mile of trailering vibration and ramp loading/unloading. Our proprietary rubber coated carabiners at truckbrotools.com solve this universal boater pain point with three unmatched design features built for marine trailering use:
Full Encirclement Soft Rubber Coating: Every contact surface of the carabiner body and gate is lined with thick marine-grade rubber, creating zero-scratch anchor points for tie-down straps, safety chains, ½” diameter dock lines, and winch accessories. No more permanent gel coat abrasions or scratched aluminum hulls from unprotected metal hardware.
Industrial Heavy-Duty Load Rating: Engineered for full-size boat trailering loads, each rubber coated carabiner supports extreme working weight limits suitable for securing fishing boats, ski vessels, and mid-size cruisers during cross-state highway trailering. The reinforced steel core retains structural strength while the outer rubber absorbs road vibration shock to reduce strap fatigue.
Universal ½” Rope Compatibility: As requested by hundreds of our marine customers, our carabiner gate opening and body clearance easily accommodates thick ½” marine dock ropes, ratchet tie-down straps, and trailer safety chain links, eliminating fit issues common with smaller standard carabiners sold at general marine retailers.
Additional TruckBroTools Trailering Hardware Pairings to Complete Your Safe Boat Trailering Setup:
Heavy-duty polyester transom & bow ratchet tie-down straps, sized to match our rubber coated carabiners for seamless attachment
Marine-grade cross safety chains with rubber coated end clips to protect tow vehicle bumper paint
Replacement trailer winch cables and bow safety straps as secondary fail-secure load restraints
Roller bunk trailer support accessories to reduce hull friction during ramp loading
All trailering hardware sold at truckbrotools.com is engineered exclusively for boat owners following our complete “how to trailer a boat step by step” workflow, built to eliminate scratches, load slippage, and highway trailering safety hazards in one complete gear package. Browse our full marine trailering hardware catalog directly on our official website: https://truckbrotools.com
Word Count Section 10: ~440
11. Boat Trailer Long-Term Maintenance Checklist to Prevent Breakdowns
Consistent trailer maintenance ensures every stage of trailering your boat step by step runs without mechanical failure. Complete this monthly and seasonal maintenance checklist to extend your trailer’s usable lifespan for decades:
Monthly Quick Inspection (After Every 3 Trailering Trips)
Test all trailer running lights, brake signals, and wiring plugs for corrosion
Check tire pressure, tread wear, and sidewall cracking from UV exposure
Tighten all frame crossmember bolts, roller axles, and bunk support fasteners
Rinse rubber coated carabiners and tie-down hardware to remove lake/salt mineral buildup
Seasonal Deep Service (Every 6 Months or Pre-Summer Boating Season)
Remove trailer wheel hubs, clean old grease residue, repack bearings with waterproof marine grease
Sand and touch up rust spots on trailer steel frame with anti-corrosion marine paint
Replace cracked, frayed ratchet tie-down straps and worn rubber coated carabiner outer lining
Lubricate winch gears, tongue jack screw, and roller axles with silicone marine lubricant
Inspect brake pads, hydraulic brake lines, and brake fluid levels on braked trailer models
Annual Full Overhaul (End of Boating Season Storage Prep)
Fully disassemble trailer wiring harness, coat all electrical contacts with dielectric grease
Replace aged trailer tires with dry rot sidewalls, install new spare tire assembly
Remove bunk boards, sand splintered wood, reapply waterproof marine sealant or replace with composite bunk supports
Clean entire trailer frame with hull wash soap, apply anti-rust undercoating to metal surfaces
Store all rubber coated carabiners and tie-down gear indoors in climate-controlled storage to avoid rubber coating UV degradation over winter
Word Count Section 11: ~270
12. Frequently Asked Questions About Trailering a Boat
Q1: What tongue weight is safe when I trailer a boat step by step?
A: Maintain 10–15% of your total loaded gross trailer weight (GTW) as tongue weight. Too light creates dangerous highway sway; excess tongue weight overloads your tow vehicle rear suspension and brakes. Shift heavy boat gear forward toward the bow to adjust tongue weight easily before trailering trips.
Q2: Can I trailer my boat without a spotter at the launch ramp alone?
A: Yes, follow our solo backing steps in Section 5, use a tow vehicle backup camera, wheel chocks, and rubber coated carabiners to secure temporary dock lines while maneuvering your boat on and off the trailer without assistance.
Q3: Why does my boat gel coat scratch every time I load/unload at the ramp?
A: Bare metal carabiners, strap clips, and unlined trailer hardware rub against your hull during trailering vibration and ramp sliding. Switch to rubber coated heavy duty carabiners from truckbrotools.com—full soft rubber lining eliminates all metal-to-hull contact scratches permanently. Our models fit standard ½” marine ropes and all tie-down strap hardware for full compatibility.
Q4: How deep should I back my trailer into the ramp water to launch my boat?
A: Roller trailers only require rear rollers fully submerged to float the boat free. Bunk-style trailers need enough water depth to lift the entire hull off bunk boards before releasing the winch cable to avoid scraping the hull bottom on wood supports.
Q5: Do I need separate transom tie-down straps for highway trailering?
A: Absolutely. The bow winch cable alone is not rated to hold your boat against highway bumps and sudden stops. Two heavy transom ratchet straps fastened with rubber coated carabiners act as critical secondary safety restraints to prevent stern shifting and hull damage during trailering.
Q6: Can rubber coated carabiners withstand saltwater marine environments long-term?
A: TruckBroTools rubber coated heavy duty carabiners use salt-resistant steel core and UV-stabilized marine rubber coating. Rinse fully with fresh water after every saltwater trip and store indoors off-season to maximize rubber lining lifespan and prevent surface corrosion.
Q7: What size rope works with your rubber coated trailering carabiners?
A: Our heavy-duty rubber coated carabiners are engineered to securely fasten ½” diameter marine dock lines and tie-down ropes, matching the exact specifications many of our boat customer inquiries reference for trailering and dock securing applications.
Word Count Section 12: ~300
13. Conclusion: Shop Premium Trailering Gear at truckbrotools.com
Mastering how to trailer a boat step by step removes stress, safety risks, and costly hull damage from every boating trip—this comprehensive guide covered every single stage from driveway pre-inspection, highway towing, ramp launching, boat retrieval, post-trip cleanup, long-term maintenance, and critical safety hardware selection to protect your boat investment.
The single most overlooked upgrade for seamless scratch-free trailering is our line of rubber coated heavy duty carabiners at truckbrotools.com, built to anchor ½” marine ropes and tie-down straps without scraping gel coat, aluminum hulls, or tow vehicle paint, while delivering industrial strength for heavy boat loads on cross-country highway trailering. Every piece of marine trailering hardware we design is built around real customer feedback from boat owners struggling with scratched hulls, loose load straps, and unreliable metal fasteners during ramp launching and highway transport.
Whether you own a small fishing boat, family ski boat, or larger offshore cruiser, our full catalog of ratchet tie-down straps, rubber coated carabiners, trailer winch accessories, and safety chains delivers all the gear you need to follow our step-by-step boat trailering workflow safely for years. Skip low-quality uncoated metal hardware that damages your boat and shop purpose-built marine trailering equipment optimized for scratch prevention and heavy load security directly at our official website: https://truckbrotools.com
If you have further questions about selecting rubber coated heavy duty carabiners compatible with your ½” dock ropes or custom trailering strap sizes, submit a contact form on our site and our marine gear support team will reply promptly with personalized recommendations for your boat and trailer setup. Safe trailering and happy boating!
Subscribe to our newsletter
Professional cargo control solutions provider. High-quality tie downs, bungee cords, ropes and cargo securing products for the transportation industry.
CORE VALUES
Quality Craftsmanship
Safety First
Versatile Applications
Constant Innovation
Customer Commitment